Easy UI in Python
Using tkinter in to make simple but elegant ui in python
What is tkinter?
The Python binding for the Tk GUI toolkit is called Tkinter. It serves as the de facto default GUI for Python and is the standard Python interface to the Tk GUI toolkit. Standard Python installations for Linux, Windows, and macOS come with Tkinter. Tk interface is where the name Tkinter originates.
Installation
Open a command line and type
pip install tk
You should see something like this:

Basic Usage
Open vscode and make a new file. Call this file main.py in there type this code:
from tkinter import *
from tkinter.ttk import *

# creates a Tk() object
master = Tk()

# root window
master.geometry("256x128")
master.title("Test Window")

# BUTTON For QUIT
btn1 = Button(master, text ="Quit", command = quit)
btn1.pack(pady = 10)

# mainloop, runs infinitely
mainloop()
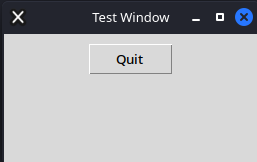
You should get something that looks like:

And there you have it, a simple GUI in python. Although we are not done yet… We can actually add more than just buttons to our interface. We can also style it. I will show you how to in the next chapter.
Intermdiate Usage
This is where it will become a bit more complicated. Either make a new file or delete the contents of the basic one and type this code in:
from tkinter import *
from tkinter.ttk import *

# creates a Tk() object
master = Tk()

# root window
master.geometry("300x140")
master.title("Test Window")

#Make text draw on root window
txt1 = Label(master, text="Input sometthing to print to command line")
txt1.pack(pady = 10)

#Make a textbox for input on root window
inputtxt3 = Text(master, height = 1, width = 20)
inputtxt3.pack(pady = 10)

def print_to_cmd():
    inp = inputtxt3.get(1.0, "end-1c")
    print(str(inp))

# BUTTON For QUIT
btn1 = Button(master, text ="Print", command = print_to_cmd)
btn1.pack(pady = 10)

# BUTTON For QUIT
btn2 = Button(master, text ="Quit", command = quit)
btn2.pack(pady = 10)

# mainloop, runs infinitely
mainloop()
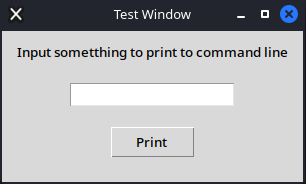
Run it and you will see somthing like this:

When you enter something into the the text box and press print you will see this in you console:

Advanced Usage
We can actually use python in Opbject Oriented Mode to have the ability to have multiple windows in one. Write the code below and run it.
from tkinter import *
import tkinter as tk
from tkinter.ttk import *

class widnow2(tk.Toplevel):
    def __init__(self, parent):
        super().__init__(parent)

        self.geometry('256x128')
        self.title('Dossing Window')

        def Quit_Win():
            self.destroy()

        tk.Label(self, text="This is Window 2").pack(pady=5)

        tk.ttk.Button(self, text='Close', command=Quit_Win).pack()

        # mainloop, runs infinitely
        mainloop()

class master(tk.Tk):
    def __init__(self):
        super().__init__()

        self.geometry('256x128')
        self.title('Window1')

        def quit_program():
            quit()

        tk.Label(self, text="This is window 1").pack(pady=5)
        tk.ttk.Button(self, text='Open Window 2', command=self.open_window2).pack(pady=5)

    def open_window2(self):
        window = widnow2(self)
        window.grab_set()

if __name__ == "__main__":
    app = master()
    app.mainloop()
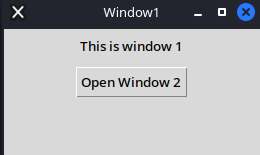
When Activated you should see this:

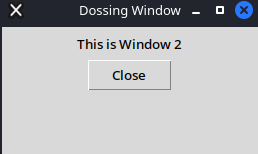
When you the press the button this will appear:

If you can see this you have completed this succsefully. All of these different scripts can be combined together. All with their own functionality.
Conclusion
As seen above creating good looking gui’s in python are easy. All you have to do is add is add another object and then copy and paste that funtion in the main class that is used to open window2. As you can see this is very easily scaleable.